Many workflows generate intermediate files that you won’t ever use again once the pipeline has run to completion. If those files are fairly small, it’s a minor nuisance that you can probably just ignore. However, if the files are large, or if there are very many of them, you can end up incurring significant storage costs for no reason. One large-scale project we support realized that, at one point, 85% of their storage costs were due to intermediate files that no one ever looked at. Yikes!
The good news is that we recently introduced a couple of options for removing those pesky intermediate files without having to manually trawl through the execution directories where they are stored. There’s a “proactive” option, which involves checking a box in the workflow configuration before you launch it, that tells Terra “go ahead and delete intermediate files when the workflow has run successfully”. And for cases where you already ran the workflow without checking that box, there’s a “reactive” option, which involves running some custom functions in a notebook to delete intermediates in bulk after the fact.
The basic operations are all documented here, but personally, the thought of deleting data gives me cold sweats, so I thought it might be useful to go through a concrete example of how all this works in practice. There’s some context to why it’s set up the way it is that might not be obvious if you’re not a seasoned WDL developer. Being aware of that context may help you make more informed decisions about how to tackle intermediates in your own work, regardless of whether you write any WDLs yourself or not.
Meet our example workflow
I picked out a two-step workflow to illustrate the WDL context in a way that should be accessible even if you don’t have much experience with WDL.
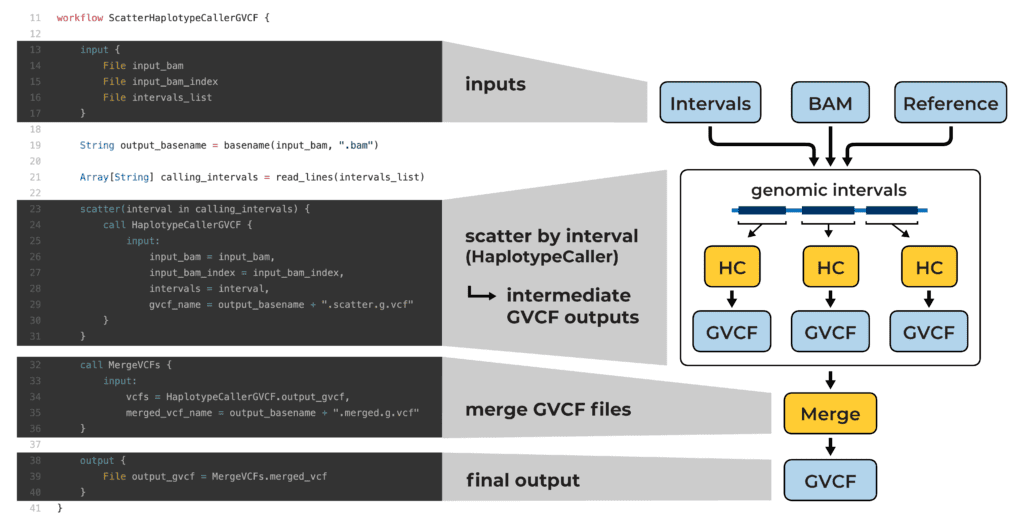
This workflow runs a genomics tool called GATK HaplotypeCaller, which identifies variants in genome sequencing data (stored in a file format called BAM). It’s a tool that can take a long time to run on a whole genome, so we split up the genome into smaller intervals and run the tool separately on each interval with a scatter function. In the cloud, we can run all these scatter jobs in parallel, so the overall work will be done much sooner. But —of course, there’s a but— each job produces its own output file, so that leaves us with a whole lot of separate files (called GVCFs) containing results for each of the genome regions. That’s a bummer because, for our next analysis, we want one single file containing results for the entire genome. To that end, we include a file merging step that combines all the results into a single GVCF file.
So in the end the workflow gives us what we want —a single file with all the output data— but we still have all the per-interval files in storage, which are entirely redundant with our final output. Those are all “intermediate” files we want to get rid of.
Configuring the workflow to delete intermediate outputs
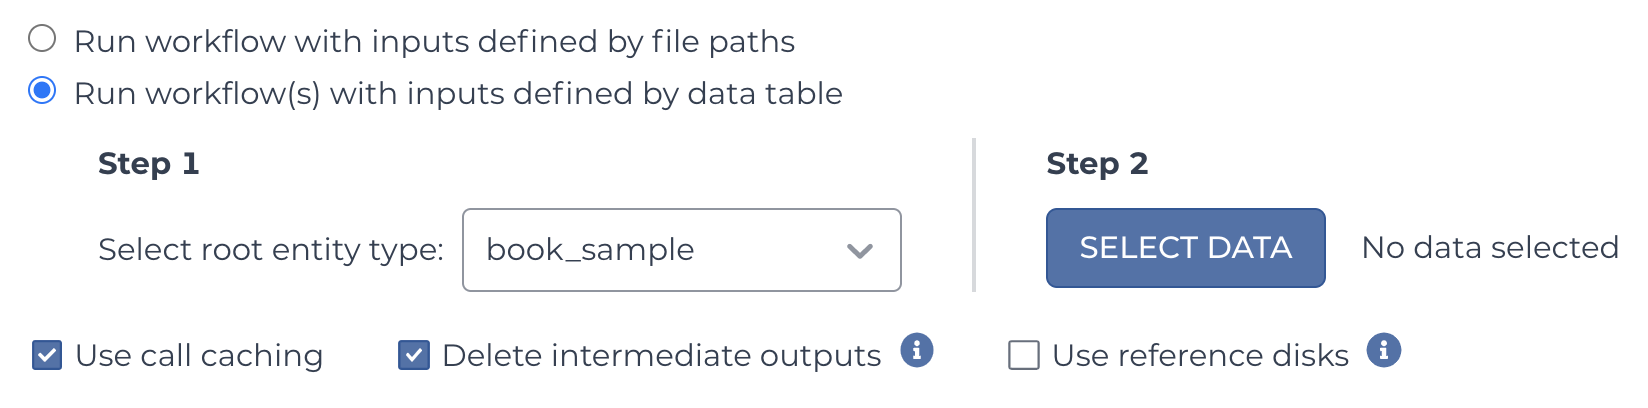
Let’s decide upfront that we want to delete the intermediate files once the workflow is done. According to the docs, all we need to do to get Terra to delete them is to check the box labeled Delete intermediate outputs in the workflow configuration, as shown below:
That seems pretty straightforward. But how does Terra know which output files are intermediates and which are the final outputs? Is it just based on whatever gets generated last? (spoiler: no)
Final outputs are defined in the WDL code
The WDL language allows workflow authors to specify what should be considered the final output(s) of the workflow, i.e. files they want to keep around once the execution is complete. If we look at the WDL code for the workflow from our example, this is the important bit: the workflow output block (lines 38-40)
output {
    File output_gvcf = MergeVCFs.merged_vcf
}
This specifies that the “merged_vcf” file produced by the “MergeVCFs” task should be considered a final output of the workflow, under the name “output_gvcf“.
Any task output not listed in there will be considered an intermediate. And just to be clear, yes, you can list multiple outputs (including outputs from different tasks) in the workflow output block. See lines 156-217 of this other workflow for an example of an impressively long list of final outputs.
The nice thing about this system is that WDL authors can use it to mark as “final output” any output produced at any step of the workflow, not just the ones that are run last. So if you have a workflow that is composed of multiple steps (maybe even multiple branches), and there’s an output produced by one of the early steps that you care about, you can list that output in the workflow output block too.
Terra uses the WDL output definitions to determine what to keep
As you might have guessed already, Terra is going to use those output definitions from the WDL to determine what files to keep vs. what to delete when you enable the “Delete intermediate outputs” option.
When you import a workflow into your workspace, Terra parses the code and identifies two sets of things: the workflow inputs, which it lists in the INPUTS tab of the workflow configuration page, and the workflow outputs, which it lists in the OUTPUTS tab, as shown below:
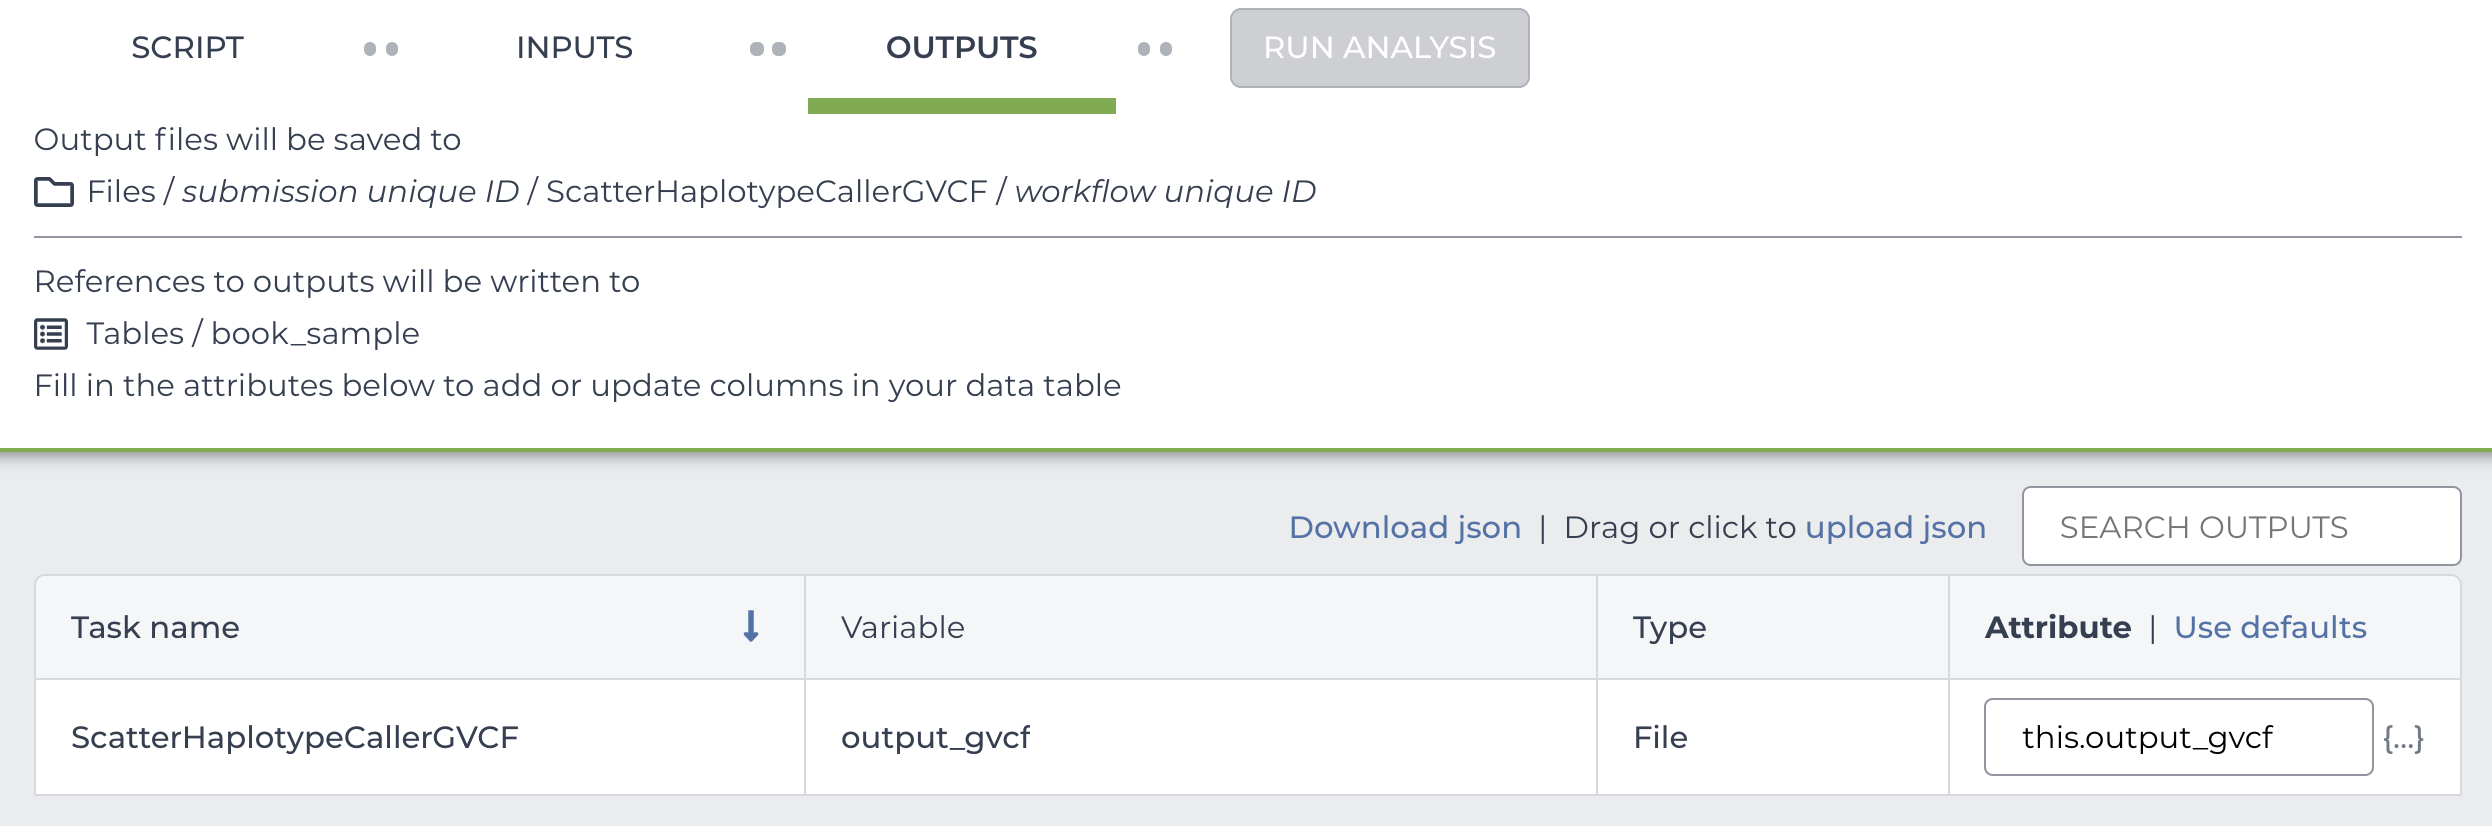
Here you see the output_gvcf that we saw earlier defined in our workflow’s output block. Conversely, you don’t see listed any of the outputs from the first step of the workflow, which is scattered over genomic intervals. Those unlisted outputs actually get saved automatically to cloud storage at the end of each job, and they stay there indefinitely —and somewhat invisibly— unless you enabled the intermediate deletion option. If you did enable the deletion option, the system will perform a cleanup operation that deletes all unlisted outputs once the full workflow has run to completion.
And that’s how the “proactive” deletion option helps you save money by avoiding pointless storage costs. But we’re not done; there’s another way to clean up intermediate outputs.
Deleting intermediate outputs after the fact
Let’s pretend we ran our workflow without the deletion option enabled, or maybe we ran it a few months ago before that option even existed. Now we have these intermediate outputs sitting around, and we’d like to get rid of them. This is a bit trickier —there’s not a simple checkbox that works in all cases— but if our use case fits certain requirements, it is possible to do this without manually combing through execution directories.
The key to this is a Jupyter notebook, which you can find in this workspace, that contains some template code for deleting intermediate outputs independently of the workflow system. This uses a system called an API, which lets you execute certain actions programmatically, bypassing Terra’s graphical user interface. The template code in the notebook is set up to make an “API call”, i.e. send a correctly formatted instruction that will trigger the deletion process; you just have to edit the bits that specify which workspace you want to clean up.
args=["fissfc", "-V","mop", "-w", WORKSPACE_NAME, "-p", WORKSPACE_NAMESPACE]

fiss_func(args)
However, there is a catch: this approach only works for workflow submissions that were configured to use data tables. Why? Well, to make it make sense, we need to take a tiny detour through how Terra updates data tables when you run workflows on their data.
If you’re not familiar with Terra’s data tables system, and the related concept of Data Model, have a look at my introductory post on this topic, which explains the basic idea and links to some relevant docs and tutorial videos.
Terra uses the workflow output definitions to update the data table(s)
Remember the screenshot from earlier, showing the OUTPUTS tab in the workflow configuration? That is not something Terra shows you just as an FYI; when you’re using data tables to configure workflow inputs, output definitions play an important functional role.
Once a workflow completes successfully, Terra will look up each output listed in that tab and automatically add a link to the output file’s location in the appropriate data table, based on how you set up the workflow inputs. As a result, you’ll be able to find that piece of data —and run subsequent analyses on it— without having to search for it in the storage bucket.
The technical term for this functionality is “binding outputs to the data model“, and it’s incredibly useful. The data tables system admittedly comes with a learning curve, and it’s technically optional since it is possible to bypass it and run workflows using just direct file paths as inputs — but it’s worth the effort to master data tables because they will lift mountains for you down the road.
And, here’s why we brought this up here: the notebook-based intermediate deletion option relies entirely on this.
Intermediate deletion after the fact relies on final outputs being listed in data tables
Here’s the thing. We can flip the output binding logic —if it’s a final output, add it to the table— to retroactively determine, given a table, what were the final outputs of a workflow. If it’s in the table, it must have been a final output. Accordingly, the deletion instruction that the notebook uses to clean up intermediates is engineered to look up each workflow submission in a given workspace, check which of its outputs are listed in one of the data tables, and delete any other output files within the execution directory (log files, which are spared).
Of course, that “given a table” clause is doing a lot of lifting here. If there is no table, because we ran the workflow directly on file paths, then we don’t have a straightforward way to determine which files we should care about.
Try it out on some data you don’t care about first!
I hope this post helped you better understand these two deletion approaches. For your next step, I vigorously encourage you to try out both of them on data that you don’t care about, to check that the system is behaving the way you understood it, and to make sure that you have a good handle on the caveats. Once the data is gone, it is gone.
If it helps, the example workflow I referenced earlier is available in a public workspace that you can clone as a testbed. The workspace includes two different configurations for the same workflow; one for using data tables, and another for using direct file paths as inputs, so it’s convenient for comparing the two approaches across different use cases. Good luck and don’t hesitate to reach out to the Terra Helpdesk if you run into any trouble.