This blog post is part of a series based on the paper “Ten simple rules for large-scale data processing” by Arkarachai Fungtammasan et al. (PLOS Computational Biology, 2022). Each installment reviews one of the rules proposed by the authors and illustrates how it can be applied when working in Terra. In this installment, we cover features that Terra users can take advantage of to communicate key project information to collaborators, keep records of workflow executions, and document analyses done in interactive environments for reproducibility.
Hot on the heels of “Don’t reinvent the wheel“, we tackle another deceptively simple rule: “Document everything”, an exhortation that may seem self-evident but can be quite challenging to apply consistently in practice.
“If it’s not written down, it didn’t happen.”
In their paper, Arkarachai Fungtammasan and colleagues motivate this rule primarily by calling out the necessity of ensuring effective transfer of knowledge within teams, particularly large collaborative teams that experience staff turnover. They also wisely point out the utility of progressively recording information that will later need to be collated for documentation, which I interpret as documentation intended for an external audience, e.g. for a research publication.
“[…] As members join and leave the team working on a large-scale data processing project, remembering why each decision was made can become difficult. A simple log with what the decision is, what the rationale for it is, who contributed to making it, and who agreed or approved with it can be enough. […] This information can also be helpful to have consolidated when creating documentation explaining the pipelines used [11].”
This is a compelling argument, deeply relatable. Even folks who are working mostly solo rather than as part of a large team should recognize the value of setting up their future self for success when the time comes to write the Materials and Methods section of their manuscript. To (badly) paraphrase the great Ru Paul, if you don’t document the work for yourself today, how the heck are you going to document it for somebody else in six months or more?
When it comes to solutions, the authors’ recommendation centers on the use of project management tools.
“There are multiple approaches to logging decisions, but a powerful and common approach is to repurpose project management systems such as GitHub Issues. Doing so effectively ties decisions to code or documentation changes, allows for historical record including discussion, can handle decision dependencies, and can incorporate formal review process automation.”
We can certainly agree it’s a great idea to use a formal project management system to track work in general, and I for one wish that had been covered in my graduate school education. The specific suggestion of Github Issues will work particularly well for people whose work has a strong code development component, since they’re likely to be using Github already. I’ll note that there is also an add-on for Github Issues called Zenhub that provides additional project management functionality, and is free to use with public repositories. And of course, there are plenty of other options with different feature sets for teams that have different needs and preferences.
Yet while this recommendation does a great job of addressing the need to capture information about decision-making and code development processes for posterity, it doesn’t really touch the question of how to document analysis work at a granular level — e.g. which pipeline was run on which data, what was the command line, what were the outputs etc — without having to do an inhuman amount of manual input.
This is admittedly a difficult question to address in a generic way, because the answer depends so much on the specific platform or environment you’ll be using to do the work.
Fortunately in this post I have the luxury of focusing on how you can apply the “Document everything” rule specifically within the Terra ecosystem. So let’s review a few key features of Terra that can help you apply this rule in three main areas: keeping records of workflow executions, documenting the twists and turns of your interactive analyses, and communicating the purpose and contents of a project workspace.
FYI, the closely related topics of version control and monitoring execution are the object of separate rules, which we’ll get to in a few weeks.
Keep detailed records of workflow executions
Running workflows at scale can be very challenging due to a range of factors including the amount of data involved, the complexity of the workflows, and the importance of processing all samples in a dataset in the same way. So it’s absolutely essential that whatever system you use enables you to find out exactly what was done in any given workflow run.
I’m happy to say that is something the Terra workflow management system does particularly well. Whenever you launch a workflow (or set of workflows), the system records all relevant metadata automatically, including all command-line parameter values as well as direct links to the workflow code, input files and output files. The system also retains (and links to) copies of all execution logs, which contain information such as the exact command line that was run at each step, what logging information the tool itself produced (stdin and stderr), and additional metadata that we’ll discuss more when we get to later rules such as #10: Monitor Execution.
This logging system (and its user-friendly web interface) makes it possible to quickly find all the information and inputs you would need to reproduce a workflow-based analysis with perfect fidelity.
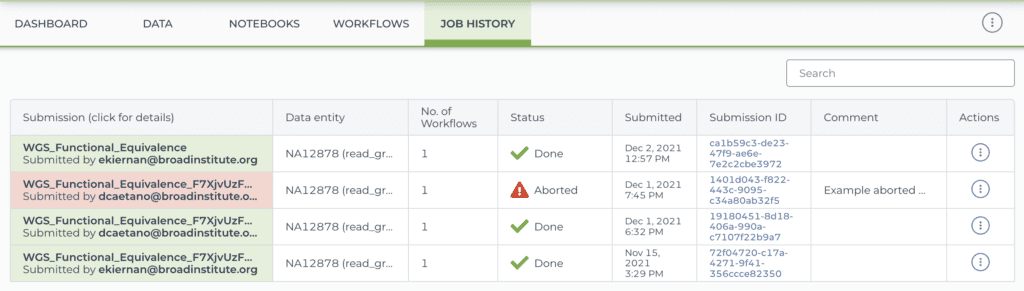
Screenshots of a workspace’s job history view: list of submissions (top) and detailed view of one submission (bottom) (browse this workspace’s job history here)
In addition to the automated logging, you also have the option of adding comments to your workflow submission, either at the time you launch it, or after the fact (including during execution). For example, in the list of submissions shown above, the second row in the table (with “Aborted” status) includes a comment that was added after the workflow run was aborted. This can be very useful for keeping track of decisions or troubleshooting notes, especially in projects with a heavy development component, where multiple attempts may need to be made on the path to success.
It’s worth noting that this commenting feature was added in response to community requests and has proved hugely popular with researchers who need to manage a lot of workflow submissions. Community feedback works!
Use Jupyter Notebooks to document interactive analyses
In my experience, the part of people’s projects that tends to be the least adequately documented is the phase of iterative data exploration, analysis and visualization that is generally typical of tertiary data analysis, which we lump under the term “interactive analysis” in contrast to automated workflows. This phase typically involves applying a variety of commands, sometimes scripted, sometimes not, within an interactive environment such as a terminal shell or an application like RStudio.
By its very nature this can be a messy, non-linear process, and unfortunately the entire process often ends up summarized in Methods sections as “We applied methods X and Y using base R and this list of packages which are available in CRAN.” It goes without saying that this is not sufficient to enable a reader, collaborator or even your future self to reproduce the work.
One increasingly popular way to address this problem, which is fully supported in Terra, is to perform most if not all of the work within a Jupyter Notebook. The Notebook environment allows you to progressively document every step and every attempted command, alternating documentation cells and code execution cells, with full logging of command outputs. This provides a much richer documentation record than “just” including code comments in a script, for example. And keep in mind that you can run almost any command-line analysis tool from within a notebook; you’re not limited to running Python and R code.
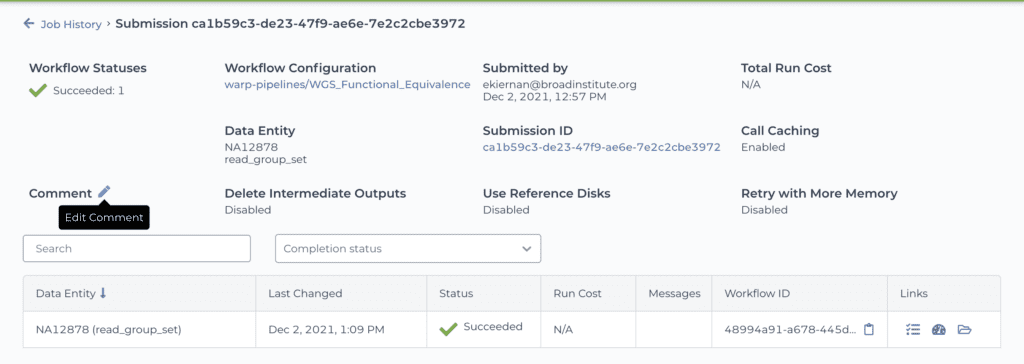
Screenshot of a Jupyter Notebook in Terra (preview mode) showing invocation and partial log output of a GATK command (see the full tutorial notebook here)
That being said, the resulting “complete record” can be a little overwhelming, so I personally like to maintain a parallel notebook in which I only include “the bits that worked”. This allows me to progressively build (and regularly re-check) the minimal end-to-end path necessary to reproduce the work. The result is a more easily readable documentation record that is pretty much ready to publish.
This approach may also be a good fit for people who find the experience of developing an analysis in Jupyter Notebook to be too constraining, and who prefer to work in an environment like RStudio (which is also available in Terra). As you progress through your analysis, record chunks of the work in a notebook in parallel, alternating descriptions of your decision-making process and the actual code executions applied to the data. If you’re used to saving analysis code in R scripts, you can simply invoke the scripts from your notebook, and combine the advantages of both sides — the flexibility of RStudio as a development environment and the documentation power of Jupyter Notebooks.
Does that mean you’ll be running a lot of computations twice or more? Why yes, it does indeed, and that’s a good thing: it’s a built-in way to verify the reproducibility of your work as you go.
Communicate the purpose and contents of your workspace
Giving teammates access to your work in Terra is straightforward; simply share your project workspace with them through the workspace sharing menu. However, there can be a lot of assets in your workspace (data, code, tools) and it’s not necessarily trivial for someone coming in to understand how it all ties together, especially if they are new to Terra themselves.
We encourage you to take advantage of the editable “dashboard” of your workspace to provide collaborators with an overview of the project that the workspace is meant to tackle, and summarize key information: what are the main assets used in the workspace (e.g. data, tools, code), instructions for running the analyses, plus meta-level information like authorship and any applicable licensing conditions. The Terra User Education team provides best-practices recommendations for how to structure dashboard documentation, based on their extensive experience developing public workspaces for educational purposes.
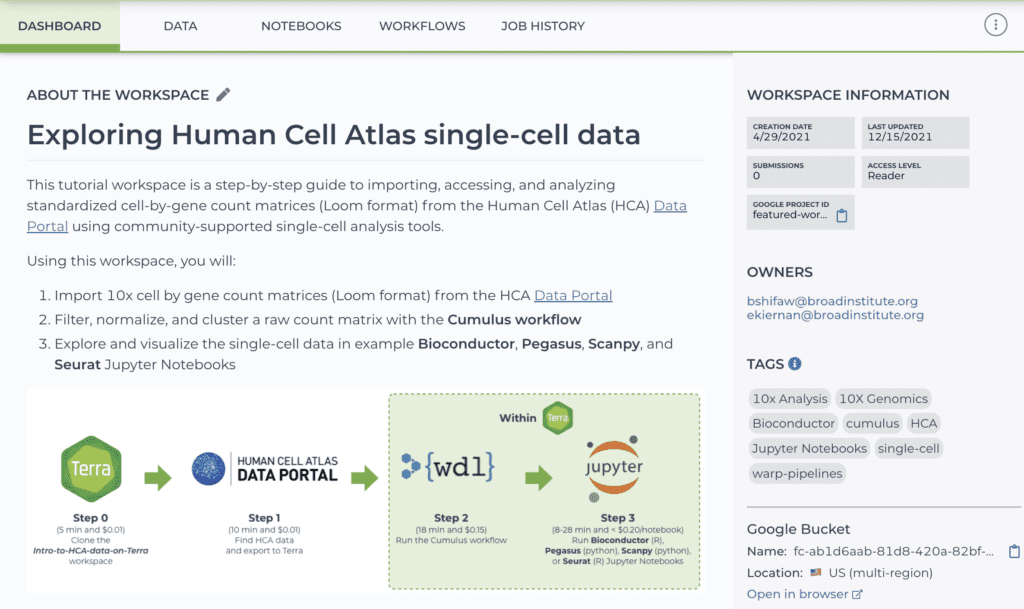
Screenshot showing part of a workspace dashboard (see full dashboard here)
One limitation here is that the workspace dashboard documentation functionality does require manual input (the information is not collated automatically) and it’s not version-controlled. Its main advantage is that it makes it possible to attach summary information as an integral part to the workspace itself, rather than relying on external/separate documents.
Some enhancements to this functionality have been discussed, like the possibility of adding a comment log so that multiple people collaborating within a workspace could post timestamped notes, flag issues and ask questions within the context of the workspace itself (rather than having to switch to an outside application).
As I hinted at earlier, we welcome feature requests, so feel free to upvote this idea or suggest your own in the Feature Requests section of the Terra community forum!