This is an updated version of a blog post written a few years ago by Jose Soto, formerly a Software Engineer in the Broad Institute’s Data Sciences Platform, who made major contributions to the original “$5 Genome Analysis Pipeline” optimization project. We’ve updated the technical content to match WDL 1.0 syntax, and refreshed the context for current times.
On a pay-as-you-go platform like Google Cloud, the rate you pay for computing resources is based on the technical specifications of the virtual machines you use; the beefier the machine — in terms of processor power, memory and disk space — the higher the rate. To save money, you need to make sure you don’t use VMs that are beefier than you need.
However, this can be challenging when you’re running workflows that involve multiple different tasks — encapsulating different command line tools — which may all have very different needs. Imagine you’re starting with a simple format conversion task, where you have a big pile of data in one format and you need to rewrite basically the same information but represented in a different file structure. You can do that with a basic CPU, but you need a lot of disk space to accommodate the original input and the reformatted output. Now imagine the next thing you need to do is an analysis that distills the evidence you find in that big pile of data into a set of summary statistics. That probably involves running some complex algorithms that require a lot of processor power and memory, but not nearly as much disk space as the previous task, since the output is much smaller than the original input.
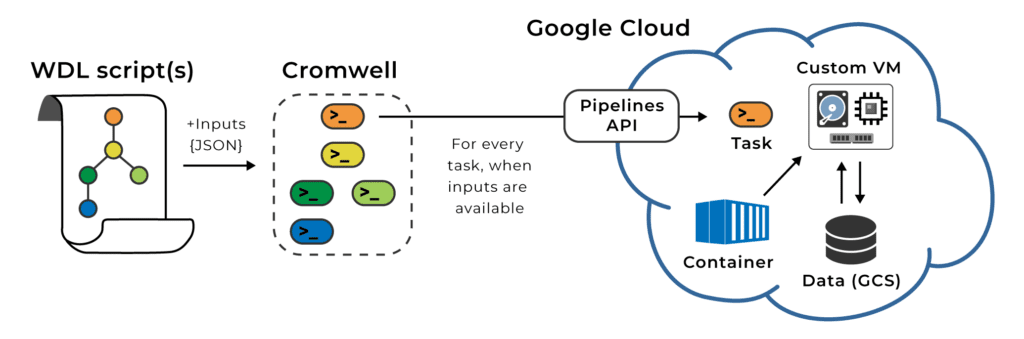
Fortunately the workflow execution system we use in Terra, Cromwell, allows you to allocate resources separately for each step in your workflow: each step will get executed on a separate VM with its own technical specs for processor power, memory and disk space. You “just” need to specify what those specs should be, either directly in the workflow script (written in WDL) or in the list of parameters you provide for a given submission.
That allows you to tailor resource allocations based on what each task needs, which can substantially reduce your overall computing costs. Yet it raises the inevitable question…
How do you determine what those resource allocations should be?
In practice, processor power and memory are typically things that you can set once for a particular tool, based on the tool developer’s recommendations, and have that setting apply to the majority of the work you plan to do. In contrast, how much disk space you need is much more variable, since it usually depends on the size of the input files that you’re feeding in. That can vary enormously when you’re dealing with data types like whole genome sequence; depending on how much sequence coverage you have, whether the data is split by chromosome or by even smaller intervals, and so on, file sizes can differ by hundreds of gigabytes from one batch of data to the next. So that’s typically something you’ll need to optimize over a few iterations when you’re writing or adapting a new workflow.
To help you navigate this challenge, we pulled together some recommendations from our colleagues in the Broad’s Data Sciences Platform pipeline engineering team, who have a ton of experience optimizing workflows to be robust, efficient and economical. This is not the only approach you could take, but it’s one that has the benefit of breaking down the problem into distinct phases so you can focus on one part of the problem at a time.
These recommendations assume some basic familiarity with WDL syntax. If you are completely new to WDL, consider checking out the OpenWDL community’s learn-wdl project, which includes tutorials and a video-based course. For an introduction to running workflows with WDL and Cromwell in Terra, see the Workflows Quickstart video.
Step 1: Just get it to work with ballpark numbers
When you start out working on a new workflow, don’t worry too much about optimizing anything. You’re probably running on some small-scale test data anyway, so any single run shouldn’t cost you much. In this phase, what matters is to see that you can get the tools running and producing expected outputs.
So for each task, just put in an overestimated value for disk space allocation, hardcoding it directly into the disk runtime attribute of the task so you can get it to work and move on.
runtime {
    docker: "broadinstitute/gatk:4.2.0.0"
    memory: "3000 MB"
    disk: "local-disk 500 HDD"
  }
Here, “local-disk 500 HDD” means “use a regular hard drive (HDD), 500 GB in size” (gigabytes are used by default unless another unit is specified).
Step 2: Add in some flexibility with parameter variables
Once you’re satisfied that the task works, you can start refining your WDL to give yourself more flexibility by parameterizing resource settings. You can put in a variable that is referenced in the disk runtime attribute; that way you can pass in a custom value for it, along with other inputs and parameters, whenever you launch the workflow. That allows you to try different values without having to edit the script itself each time.
The task definition would look like this:
task ProcessSomeData {

    inputs {
        Int disk_for_my_task
        … # other inputs
    }

    runtime {
        docker: "broadinstitute/gatk:4.2.0.0"
        memory: "3000 MB"
        disks: "local-disk " + disk_for_my_task + " HDD"
      }

      … # command and output blocks
}
Now the disk size is passed in as an input to the task, using the disk_for_my_task variable.
One drawback to this formulation is that if you leave it at that, every time you call this task, you have to come up with some value for disk that should probably maybe work for that specific set of inputs — and as we discussed above, this can vary wildly depending from run to run. If you guess too high, you’re going to spend money for nothing, and if you guess too low, your task is going to fail when it runs out of disk space, which is super annoying and a big waste of your time.
Step 3: Get the right size automagically
This is where it gets really cool: you can actually have the system to calculate how much disk size to use based on the size of the input files! That is, of course, assuming you have some insight into the ratio of input to output, which you can derive from a few test runs.
At the start of each task, the system has access to information about the specific input files it’s going to need to localize and operate on. So you can tell it to query the storage system before it starts requesting resources, retrieve that size information, and apply a calculation (that you provide in the script) to determine how much disk space is needed based on the input data.
What calculation, you ask? Let’s run through an example. Say you’re doing that format conversion from earlier; you need to account for the input file (input_bam), the output file which is roughly the same size (so we multiply input size *2), probably some accessory files like a genome reference (ref_fasta) and its dictionary file (ref_dict), and finally add a bit of padding just to make sure the tool has enough headroom. For padding, let’s put in a disk_pad variable and an extra 5 GB of hard-coded padding. Here’s what the calculation looks like:
Int disk_for_my_task = ceil(size(input_bam, "GB")*2 + size(ref_fasta, "GB") + size(ref_dict, "GB")) + disk_pad + 5
In this statement, we start by querying the file sizes with the aptly named size() function, requesting gigabytes (GB) as the unit. We then add up the sizes of the main input files, account for the output by multiplying the input size by a factor of two, round up the total with ceil() (which is short for “ceiling”) to return an integer value, and finally add the padding. The result is the amount of disk space we’re going to allocate to our task at runtime.
You can learn more about the functions used in this example in the WDL specification. Of particular interest, the size() function has some neat options that we don’t show here, like the ability to take an array of files as input and return the sum total of their sizes. That can help streamline the calculation statement for tasks that use multiple input files.
To fit the “autosize” trick into an actual workflow, you can simply add the calculation inside the task definition, replacing the original disk_for_my_task variable. Or, if you think you might want to use the result in other tasks that have equivalent requirements, you can do the calculation at the workflow level and just pass in the resulting variable to the task using the disk_for_my_task input we already wired up earlier.
Here’s what that second option would look like:
workflow MyOptimizedWorkflow {

    inputs {
        File ref_fasta
        File ref_dict
        File input_bam
    }

    # Plan on some adjustable disk padding
    Int disk_pad = 10

    # Calculate disk size based on inputs, padding and expected output
    Int disk_for_my_task = ceil(size(input_bam, "GB")*2 + size(ref_fasta, "GB") + size(ref_dict, "GB")) + disk_pad + 5

    call ProcessSomeData {
        input:
            input_bam = input_bam,
            ref_fasta = ref_fasta,
            ref_dict = ref_dict,
            disk_for_my_task = disk_for_my_task
    }
}
Out of all that, accounting for the output size is usually the trickiest part, since you need to have some prior knowledge of what to expect based on what the tool does. Running a few small-scale tests can be very helpful here.
You might also find it useful to browse through the pipelines in the WARP repository, which contains a variety of cloud-optimized workflows maintained by our pipeline engineering team. There’s a lot to learn just from looking at how those are set up, and you may find some inspiration for how to deal with specific challenges in your own workflows. Good luck!